6/5/15

Boost Your Mood with the Elements Collection by Red Water Designs

Disclosure: I received product at no charge in exchange for my honest review.
The four elements - Earth, Water, Air, and Fire - were believed to be the essentials of life by ancient Greek philosophers. It was believed that everything in our universe was a representation of a mixture of the four elements in different proportions. Red Water Designs is a lovely jewelry collection that combines simplistic beauty with the natural powers of gemstones to reconnect us with the basic elements that shape us.
I received the stunning Fire Element Toggle Bracelet, a double strand of red and orange resin beads and glass seed beads, and beautiful Fire Agate Gemstones. Fire Agate is believed to be a protective stone used to relieve fear, and create courage, protection, and strength. Fire Agate also aids in spiritual advancement. The toggle bracelets also feature a goldtone charm with the name of the represented element.
Wearing this beautiful 7.5" Fire Element bracelet is a wonderful reminder to me to be brave and strong. What a great jewelry gift idea for a young lady going off to college or camp for the first time, or for those who are fighting personal battles or medical challenges. The Toggle Bracelet is available in all four elements - fire, earth, water, and air - so you can choose the one that best represents the desired mood or inspirational boost.
Red Water Designs Jewelry offers several bracelet designs and necklace designs. Check out their website at www.redwaterdesignsjewelry.com. You're sure to find the perfect gift!

Saver Emergency Breath System Prevents Smoke Inhalation from Fires

Disclosure: I received compensation for my post.
My husband was a volunteer firefighter in the years before we met. He's seen his share of horrifying moments. Imagine your house is on fire, in the middle of the night, with dark billowing smoke all around you, and you not only have to get yourself out of the house, you can hear all your children in their rooms coughing and choking on the smoke. Did you know that 80% of deaths from fires are due to smoke inhalation?
Saver is an emergency breath saver system, designed to prevent smoke inhalation. The compact design of this essential personal life-saving device allows users to breath clean air and be able to get out of a fire before succumbing to smoke inhalation. It comes with a flashlight to help guide you out of a fire, and works as a signal for rescuers to find you even in dark smoke. There is also a built-in alarm to help notify first responders of your location. Saver is easy to use, even for children.
Saver is designed with Triple Filter Technology, that includes a Prefilter for smoke and dust, a Hopcalite filter for carbon monoxide, and a HEPA filter for toxic fumes. This triple filter will give you 5 minutes of clean air to breathe so you have time to get out of the house before being overtaken by the smoke. Saver activates in less than 5 seconds.
The triple filter removes smoke and dust, carbon monoxide, second-hand smoke, and toxic smoke and materials. The Hopcalite actually turns carbon monoxide into carbon dioxide. Breathing through a Saver device prevents toxic elements from entering your respiratory system, which reduces the risk of fire fatalities and long-term implications from smoke inhalation.
Saver's award-winning design is small and sleek. You can easily store the portable unit in your office desk, your handbag, or your night-table drawer. Put one next to every bed in your house to give yourself the peace of mind that you're doing everything you can to protect your family members. Keep one in the kitchen too, in case of a kitchen fire. Tuck one into your child's belongings when you send them off to college or camp. Saver even comes in a multi-user wall unit.
Saver should be an important part of your family's emergency plan. Those extra few minutes of clean breathing gives you and your family members a greater chance of escaping a fire without the tragedy of loss of life. Visit the Saver campaign page today and purchase this must-have home safety device!

Click HERE to get more information about Saver and learn how you can save by ordering yours today!

Getting Kids to Eat their Vegetables

This guest post is written by Jennifer Taylor, blogger at www.momtricks.com.

Have you ever sat at the dinner table, begging and pleading your child to at least try the food in front of them? If so, I've been there. And we're not alone: this is a very common problem that a lot of parents face. A frustrating, stressful problem. A 2010 study showed that up to 22% of children are picky eaters are some point.

But there is hope! My son Alex was a very picky eater. I couldn't even get him to try things like broccoli or cauliflower. Never being a picky eater myself, having happily gobbled down those veggies when I was a kid, I couldn't relate to not wanting to eat veggies. I was a certifiable veggie monster when I was his age! He wasn't that way. And it was extremely frustrating. We eventually made good progress against his picky eating habits, and now he's much better off! It wasn't easy, and it took a lot of work, though.

What I find works awesomely is to make them involved in the whole process of making the meal, from start to finish. There's something about being involved and important that makes them so much more willing to eat the end result. And in my experience, it works so well!
Let them pick the vegetables!

The first step, and the most crucial, is to let them pick the type of veggies you'll be using in the finished product. This is an easy one! But you have to go about this differently depending on how old your child is. For example, if your child is older, you can give them free reign to pick anything they want from the vegetable section at the grocery store. Within reason, of course. However, if your child is younger, it's much easier for you to pick out a few different veggies and then let them decide between them. While they're not making a huge decision, they're still making one, and this makes them feel involved in the whole process! It really works.
Let them pick out the recipe.

The next step is to let them decide on the recipe to use. There's really no better way to do this than by using Pinterest! You probably already have a Pinterest account, but even if you don't, you don't need one to search on the site. Just head on over to Pinterest and type in a search for recipes using your ingredients. For example, if you have a tasty zucchini, you can search for "zucchini recipes" and you'll quickly get back a whole display of awesome, tasty-looking recipes. It's such a great way to get ideas, not just for getting kids to eat vegetables, but for cooking in general! Once you have a few recipes picked out, show them to your son or daughter and ask them to pick which one looks most appealing to them. Just make sure you let them decide from amongst recipes you want to actually cook!
Let them help prepare the meal.

The final important step is to let them physically help prepare the final product. They can be involved as much as suitable for their age. For example, if they're young, even just washing off the veggies or helping add ingredients to a salad is awesome. If they're older, they can be more involved, and maybe even help cut veggies or mix things. Safety is important, so keep them to only activities that they can't accidentally hurt themselves doing. As long as they're doing something to help, they're going to feel both important and involved!

Summing it up.

If you let them be involved from start to finish, they're going to be much more willing to eat the final product. Letting them pick the veggies helps remove some of the fear and uncertainty of eating strange new things. Even a young child will be able to make the connection of buying the vegetable at the store to it ending up in the final product. Not only that, but having choice and being important in preparing the meal is pretty magical. It works so well, and I think you'd be surprised at how open they'll be to eating even things they refused to touch before.
What not to do.

During your struggle to get your picky eater to eat their veggies, you might be tempted to trick them and sneak veggies into other foods, like meatloaf or lasagna. But hold on there! It's just not a good idea in the long run. The difficult part is getting their little tastebuds used to the new flavors and textures of the veggies they dislike. If you mix it into other things, they're never going to get used to them, and so you might be getting them to get some veggies into their tummies now, it's not really solving the real problem.

You also shouldn't ever force them to finish the meal. This only serves to give them a negative association to the food, and further reinforces their picky eating habits. Finally, don't let them eat between meals. A hungry kid is much more willing to try new foods, but if their little bellies are full of crackers or cookies, or if they know they'll get some later if they don't finish the meal, they're not going to be very motivated to eat!

Conclusion.

Let me know if you give this method a try! I'd love to answer any questions you might have, or if you have any more suggestions, I'd love to hear them!

6/4/15

Garden Party Food Ideas from Tastefully Simple

Disclosure: I received product at no charge in exchange for my honest review.
Now that the weather is warming up, get your girl friends together and throw an old fashioned garden party! Set up a couple of tables and chairs in your backyard, hang some streamers from your trees, and whip up some quick and easy snacks and drinks from Tastefully Simple that will make your friends think you spent all day preparing.
Tastefully Simple has fabulous drink mixes, cake mixes, bread mixes, snacks, dips, salsas, and much more. If you're up to barbecuing for your garden party, don't miss their huge array of seasonings. They also offer tons of sauces, oils, and vinegars.
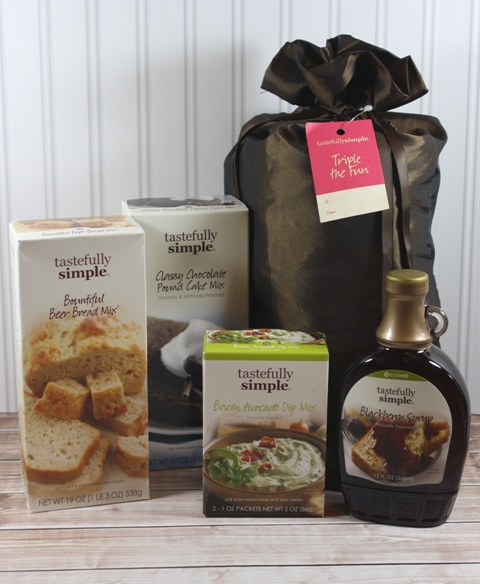
To create foods for a garden party, I received the Triple the Fun Spring Summer 2015 Drink Mix Assortment, Classy Chocolate Pound Cake Mix, Blackberry Syrup, Bountiful Beer Bread Mix, and Bacon Avocado Dip Mix. I was so surprised at how quick and easy it was to make everything!
The Tastefully Simple 
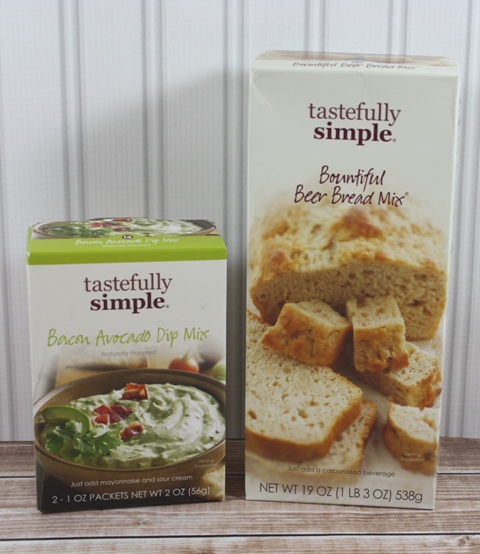
Bacon Avocado Dip Mix comes with two packets of mix for twice the fun. Just mix it up with some sour cream and mayo, and set it in the fridge to chill for 30 minutes. Set it out on your garden tables with some crackers or tortilla chips for easy snacking.
It's creamy and delicious! I had never considered combining the tastes of bacon and avocado, but honestly bacon makes everything better. For a fancier snack, you could pre-make appetizers by spreading the dip on crackers and topping with a black olive or a jalepeno slice. We absolutely love the Bacon Avocado Dip!
I've also considered 
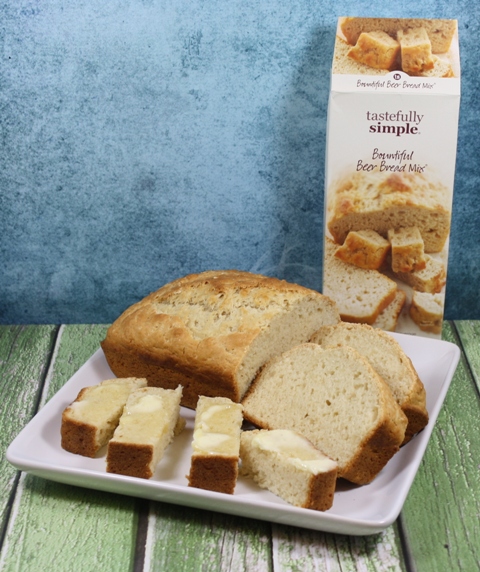
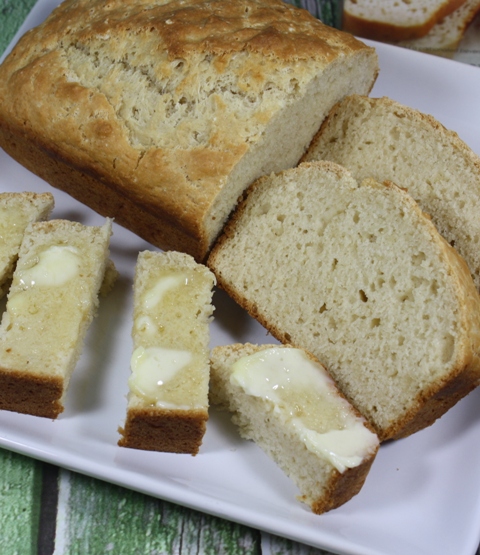
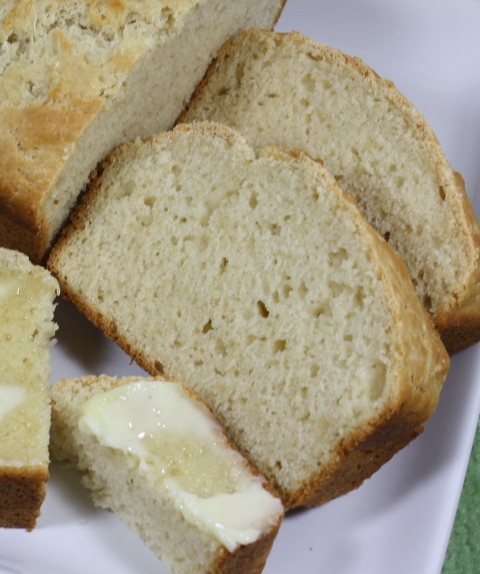
beer bread to be the ultimate comfort food. The Tastefully Simple Bountiful Beer Bread Mix is light and fluffy. Making beer bread is so simple because all you need is this mix and 12 ounces of beer (or even soda).
You can also add a bit of butter to the recipe if you want, and of course you'll want to top it with butter before you eat it. A touch of cinnamon sugar on the melting butter makes it even more amazing. If you want a bit different taste, you could spread it with jelly, jam, or a spicy mustard.
Slice the bread normally, then cut each slice into four smaller pieces and arrange them on a pretty plate. I love the soft, springy middle parts of the bread, but I have one friend who always reaches for the delightfully crunchy end pieces.
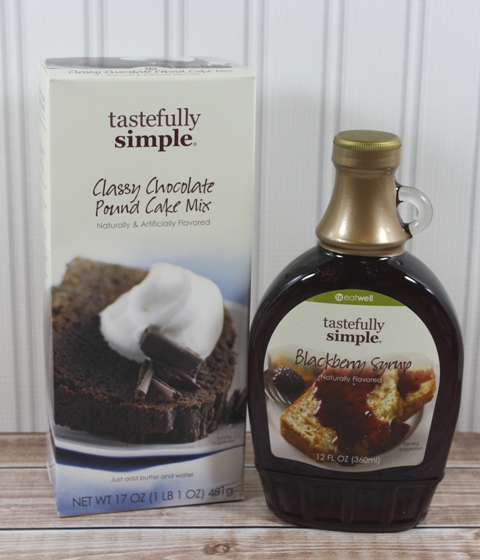
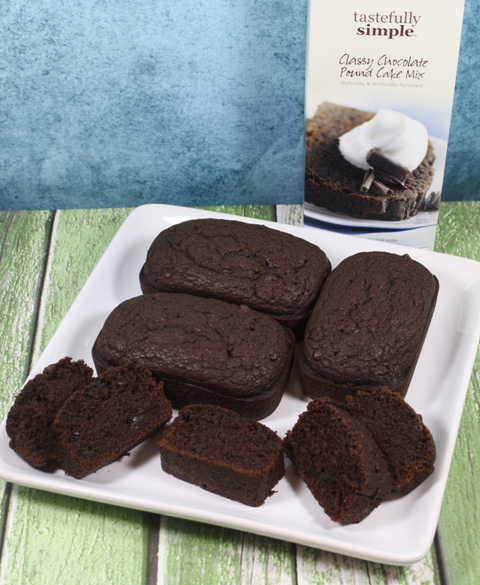
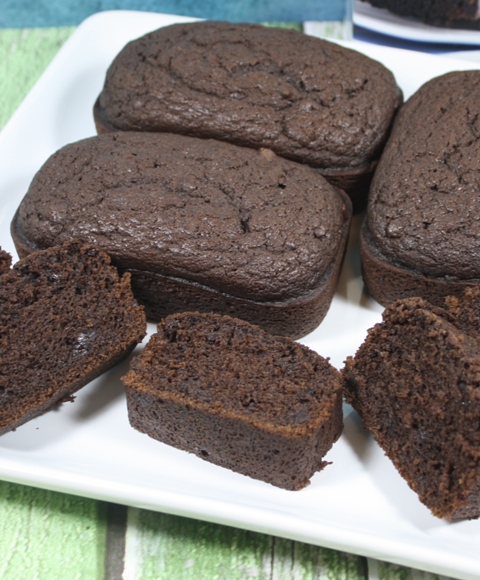
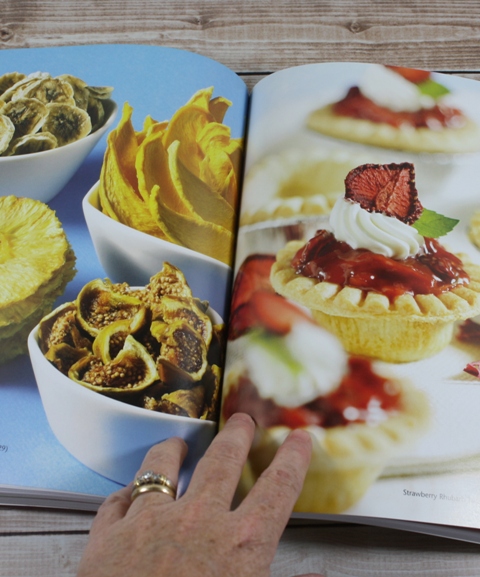
A garden party absolutely calls for chocolate! The Tastefully Simple Classy Chocolate Pound Cake Mix is so incredibly delicious that it makes you close your eyes when you take a bite of the cake. It's super easy to make with just a few ingredients from your kitchen.
You could even add some chocolate chips to the mix to make it even more chocolatey. Bake it up in some mini loaf pans for little cakes, then pre-slice them. Add a touch of flair to them by topping each slice with whipped cream, chocolate sprinkles, and a maraschino cherry.
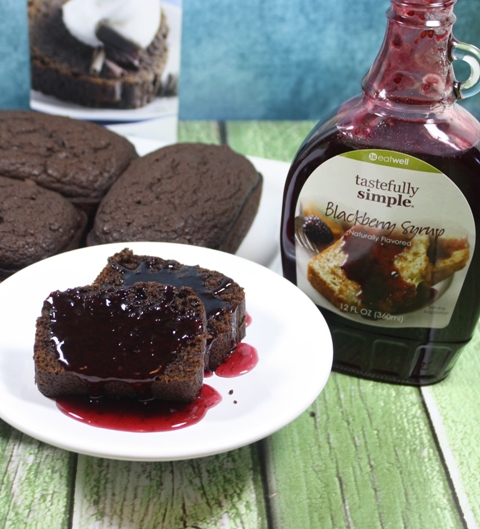
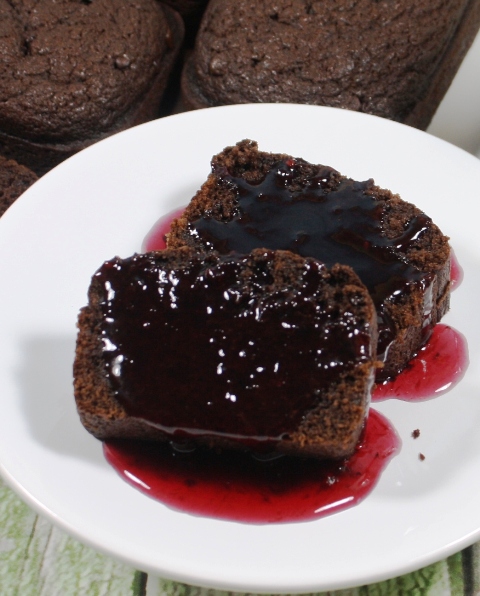
To really impress even the most discerning palates of your friends, top the slices with the Tastefully Simple Blackberry Syrup. The combination of the chocolate pound cake with blackberry syrup is over the top scrumptious! Syrup is definitely not just for pancakes.
Everything I created from the Tastefully Simple mixes turned out absolutely perfect. The ease of creating such lovely and delicious food amazes me. There is no reason to spend hours upon hours in the kitchen, worrying about whether the foods will impress, because Tastefully Simple makes it, well, tastefully simple!
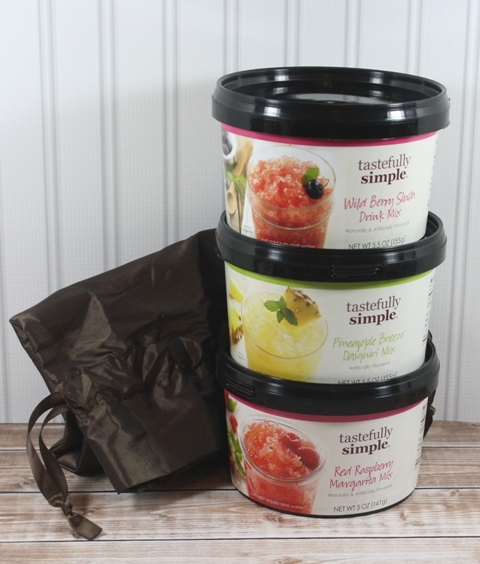
No garden party is complete without some delicious fruity drinks. The Triple the Fun drink mix package comes in a delightful bag (which makes it the perfect hostess gift) and you just add water (and the desired alcohol if you wish) to the bucket, stir, then stick it in the freezer for about 12 hours.
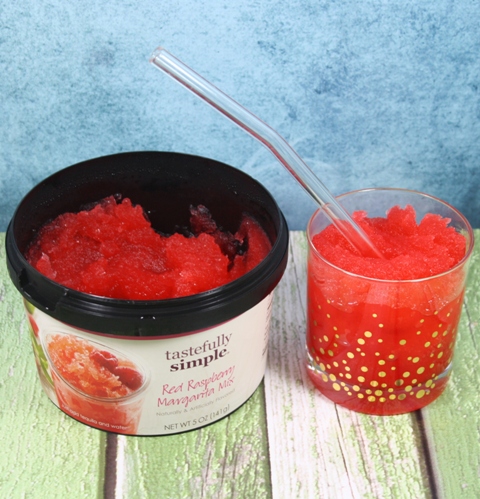
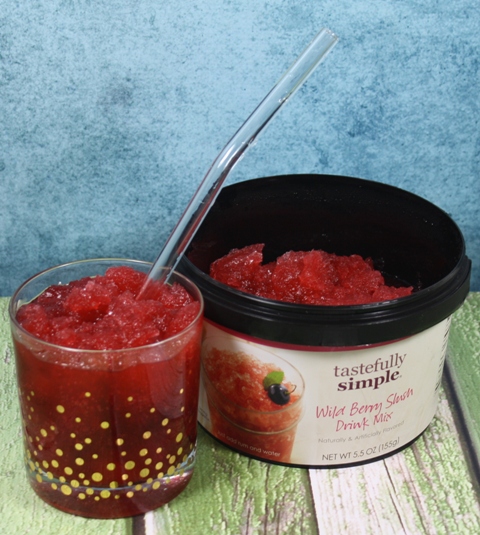
The three drinks mixes are Red Raspberry Margarita, Wild Berry Slush, and Pineapple Breeze Daiquiri. Each mix comes with simple directions for adding rum, tequila, or vodka. If you and your friends prefer non-alcoholic, then just don't add the alcohol!
I love flavored vodka, so mixed my three drink mixes with regular vodka, lemon vodka, and pomegranate vodka to create an even fruitier combination of drinks. They all turned out delicious and perfectly slushy right at the twelve-hour mark.
Grab your girl friends and set up a simple garden party in your backyard with Tastefully Simple products! Visit www.tastefullysimple.com to place an order today and be sure to check out the recipe section on their website for even more great ideas. You can also follow them on Facebook, Twitter, Pinterest, and Instagram.

The Dehydrator Bible - Review

Disclosure: I received product at no charge in exchange for my honest review.
If you have a food dehydrator, or are considering one, you should know there is a lot more you can do with it than just dry fruit and make beef jerky. The Dehydrator Bible from Robert Rose Books was created by Jennifer MacKenzie, Jay Nutt, and Don Mercer, to show you all the wonderful things you can make in your dehydrator. With over 400 recipes, you'll learn how to dehydrate herbs, seasonings, fruits, vegetables, meats and fish, plus you'll find recipes for using the dehydrated foods as ingredients. It's the book you need for making the most of your dehydrator.
The Dehydrator Bible includes easy to follow drying instructions and time guidelines that make dehydrating foods easy. When you dehydrate foods, you're able to preserve them longer, while still retaining the nutrition, and you will be wasting less food. It's also easier to transport dehydrated foods. If you have a previous edition of this book, which sold over 100,000 copies, you'll be happy to know the 2015 edition still features the original recipes, but also includes many more tips, techniques, and information about dehydrating foods.
The Dehydrator Bible is a wonderful resource and has helped me to better understand my dehydrator so I can use it like a pro, as well as provided me tons of recipes for foods like Hamburger Stew, One Pot Simple Spaghetti, Tex Mex Beef Fajitas, Apple Peach Cobbler, Blueberry Maple Butter Tarts, and many more mouth-watering recipes. Grab your copy today at Robert Rose Books!

Let Mr Beams Light Up Your Life with Wireless LED Lighting

Disclosure: I received product at no charge in exchange for my honest review.
Mr Beams is a wireless LED lighting company that can light up your life easily, efficiently, and afforably. Their extensive product line features indoor and outdoor lights, including task lighting, stick anywhere lighting, stair and step lighting, pathway lighting, ceiling lighting, spotlights, and lanterns. They are motion activated with auto shut off, which is a light sensor that prevents them from turning on during the day or in a lit room.
Mr Beams lights are all battery powered, so they can be installed anywhere, like closets, hallways, stairways, bedrooms, and bathrooms. Installation takes less than 5 minutes and is super easy with the included double-sided adhesives or use the included screws. Their website features videos about installing and using their lights, which is perfect for visual learners like me. Mr Beams sent me a two-pack of the Wireless Motion Sensor LED Slim Task Lights and a three-pack of the Stick Anywhere Wireless Motion Sensor LED Night Lights.
You may have seen my recent post about my kitchen makeover, and the Wireless Motion Sensor LED Slim Task Lights got to be a part of that project! Since I refinished the cabinets in a dark stain, we were a bit worried about whether the room would feel darker. The area under our upper cabinets was the perfect place to install the Slim Task Lights.
Using the screws, we installed one Slim Task Light under the upper cabinet on each side of our stove, centered above the counter. The lights only come on when the room is darkened and someone moves within range of the sensor, and they go off a few seconds after we're done working in that area, which also saves on battery usage because we don't have to worry about forgetting to turn them off. They are so convenient and look fabulous!
The Slim Task Lights make a huge difference in the amount of light in my kitchen work-space! Before I had the Mr Beams lights, I thought under-cabinet lighting would be difficult to install and I also thought it would be expensive, but Mr Beams lighting is simple and affordable. Best of all, you cannot see the actual task lights because of their slim profile, but you have the lighting right where you need it.
We installed two of the three Stick Anywhere Wireless Motion Sensor LED Night Lights in the back hallway of our house. There is a guest bedroom, the laundry room, my blogging office (also used as a guest room), and a guest bathroom off that hallway. We installed them quickly and easily, at a height of about knee-high at both ends of the hallway. Now when guests are here, I won't worry at night if they get up because they'll be able to find their way around more easily.
We installed the third Stick Anywhere Wireless Motion Sensor LED Night Light in our master bathroom so we don't disturb each other when we get up at night. The night lights put out just enough light without being too bright. I am absolutely thrilled with my new Mr Beams lighting and highly recommend them!
You can buy Mr Beams lighting at www.mrbeams.com and you can now buy them at Target! Their website even offers options to buy special packages, such as the Mr Beams Home Safety Storm Kit, Mr Beams Deck Kit, Mr Beams Shed Kit, Mr Beams Outdoor Safety Kit, and many others. Go check out all the great products and be sure to follow them on Facebook, Twitter, Pinterest, and YouTube!

6/3/15

Kitchen Makeover #DIY #BeforeAndAfter

*affiliate links included
When we bought our "empty nest" home last August, we knew the kitchen makeover would be a big renovation job. I loved the eat-in kitchen layout, but that's where the love ended. The kitchen was painted a combination of hunter green and pumpkin orange. There was a ceiling fan in the corner of the room (because everyone wants dust blowing on their food). The cabinets had been "refinished" with a single coat of brown stain (by what I assume to be a three year old by the looks of them) and had never been sealed. The cabinet storage was minimal. The appliances were ancient, but working. The kitchen sink was a shallow six inches deep. I had huge plans for the renovation. Home Depot loves us.
The first thing I did after we moved into our new home was paint the kitchen a beautiful Clary Sage (Behr paint #PPU11-7). From my pencil sketch on a piece of notebook paper, my husband Johnny built a floor-to-ceiling, built-in, gorgeous, fabulous, wall pantry on the large empty wall. He is still working on the doors for the pantry, but that's a whole other blog post. (Sorry for the somewhat dark photos, but light from the outside forced me to close the curtains for pictures.)
I stained the pantry (and sealed it) with General Finishes Java Gel Stain and General Finishes Polyacrylic Top Coat. They are the same products I used when I renovated the guest bathroom. It's a really dark brown, almost black, and looks incredibly clean and sharp. We left space in the corner for our big freezer.
My wonderful husband took down the ceiling fan and replaced the ceiling light with a little chandelier I picked out at Home Depot. I've always wanted an old-fashioned chandelier, but I didn't want to dwarf the kitchen with one. Although it's hard to tell in the photos (because of the backlight) the patio door curtains are a tan with dark brown stitching that looks like tree branches.
We also bought a round kitchen table and chairs since the eating area is now in the center of the room. We sold our big rectangular one when we moved out of the old house, so I saved the money from that for the new set.
Although the refrigerator and the microwave are the ones here when we moved in, the stove and dishwasher have been replaced since they both quit working shortly after we moved in. I spent an entire week refinishing the kitchen cabinets with the Java Gel Stain and Topcoat, and danced when my new cabinet hardware arrived in the mail. Watch for a post on how to refinish cabinets!
We installed under cabinet lighting on both sides of the microwave and you can see that post HERE. My incredible husband also replaced the kitchen sink for me. The new one is two inches deeper, because what gal doesn't want an extra two inches? We also selected a new faucet set for the new sink.
I absolutely LOVE the contrast between the dark cabinets and the white appliances. The countertop is an almond color laminate, which works just fine for me. I don't the busy look of granite anyway and even though these are the ones that came with the house, they are in great condition, except for a few little scratches. (The three pictures below were taken with the curtains open.)
The flooring is still the original flooring that is through most of the house. It's a laminate floor and is functional, but it was installed poorly and there are low spots in some places, as well as some spaces between some of the boards. The installers also didn't remove the baseboards. We hope to replace the laminate flooring in a year or two, with a lighter color wood.
You can see by my full pantry below, why we needed the extra cabinet storage space. Each vertical section will have a top pantry door and a bottom pantry door. We have family coming in July for our son's wedding and hopefully it will be finished by then.
I am thrilled beyond belief with my kitchen renovation! What do you think?

I put a new, lighter area rug under the dining table and chairs to brighten up the room too!

See my other home renovations here.

Share this post with the buttons below!